Dealing with a deflating air mattress can be a frustrating experience, especially when the source of the leak is not immediately apparent. Air mattress leaks are a common issue that can significantly compromise the comfort and functionality of your inflatable bed. Whether it’s a tiny puncture or a seam coming undone, finding and fixing these holes is crucial for maintaining the longevity and performance of your air mattress.
Not only does repairing leaks prolong the life of your mattress, but it also ensures a consistently comfortable and supportive sleeping experience. In this guide, we’ll provide a detailed, step-by-step approach to efficiently locate and patch up holes in your air mattress, so you can continue to enjoy a restful sleep without the unexpected deflation.
Preparation and Initial Inspection
Before embarking on the task of locating a hole in your air mattress, proper preparation is key to ensuring an efficient and successful inspection.
Preparing the Air Mattress:
- Inflate the Mattress: Inflate your air mattress to its full capacity. A fully inflated mattress makes it easier to spot where air might be escaping. However, be careful not to over-inflate as this can cause additional strain on the seams and potentially create new leaks.
- Clean the Surface: Wipe down the mattress with a damp cloth to remove dust and dirt. A clean surface is crucial for a thorough inspection, as dirt and debris can sometimes obscure small punctures or tears.
Visual Inspection:
- Check for Obvious Signs of Damage: Begin with a visual inspection of the entire mattress. Look for noticeable signs of wear and tear, such as punctures, cuts, or seam splits. Pay special attention to areas that come into frequent contact with the floor or sharp objects.
- Examine Seams and Valves: Often, leaks occur along seams or near the inflation valve. Examine these areas closely for any signs of damage or air escaping.
Feeling for Air Leaks:
- Use Your Hands: Gently run your hands over the surface of the mattress, especially where you suspect there might be a leak. You’re looking for a stream of air, however subtle, that can indicate the location of a hole.
- Listen Carefully: In a quiet room, listen for the hissing sound of escaping air. This can be particularly effective in locating very small holes that might not be easily felt.
- Focus on Susceptible Areas: Pay extra attention to the bottom of the mattress and edges, as these areas are more prone to getting punctured.
By meticulously preparing your air mattress and conducting both a visual and tactile inspection, you can effectively identify any obvious signs of damage. Remember, patience is key; some leaks may be small and not immediately noticeable.
The Soap and Water Method
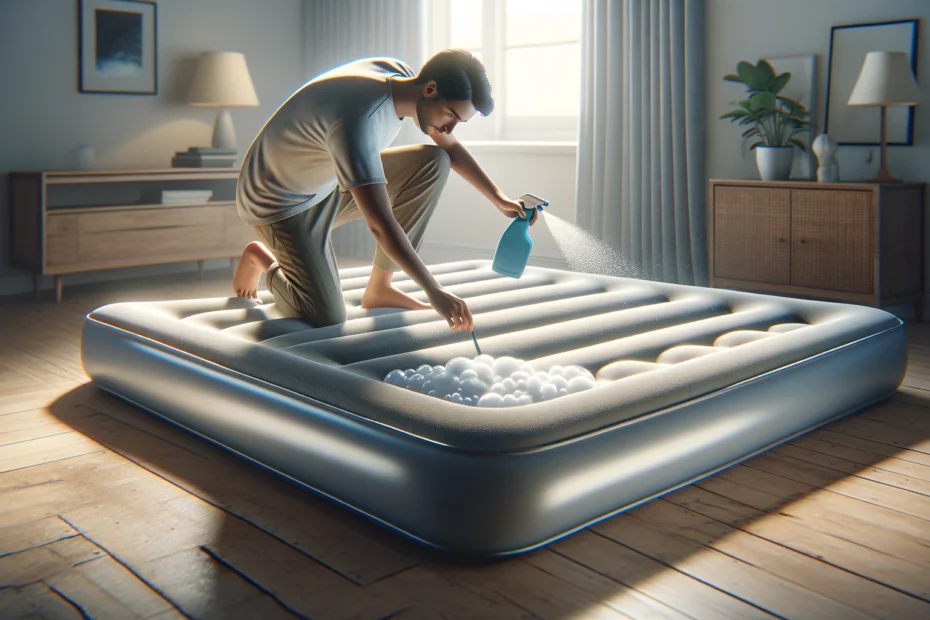
The soap and water method is a tried and true technique for detecting air leaks in an air mattress. It’s based on the principle that air escaping from a hole will create bubbles when it comes into contact with a soapy water solution. Here’s how to effectively use this method:
Step-by-Step Instructions:
- Prepare the Solution: Mix a small amount of dish soap with water in a bowl or a spray bottle. The solution should be soapy but not overly concentrated.
- Inflate the Mattress: Ensure the air mattress is fully inflated. This increases the pressure inside the mattress, making leaks easier to detect.
- Apply the Solution: If using a spray bottle, gently spray the soapy water across the surface of the mattress, focusing on one section at a time. If using a bowl, you can use a sponge or cloth to apply the solution. Start with areas where leaks are most common, such as seams, around the valve, and the underside of the mattress.
- Look for Bubbles: Carefully observe the areas where you’ve applied the solution. Leaks will reveal themselves as bubbles or froth forming on the surface. These bubbles are created by the escaping air interacting with the soapy water.
- Mark the Leak: Once you identify a leak, mark the area with a piece of tape or a washable marker. This will help you locate the leak later for repair.
- Rinse the Mattress: After completing the inspection, rinse off the soapy solution with water to prevent any residue build-up on the mattress surface.
Safety Precautions and Tips:
- Avoid Excess Water: Be cautious not to soak the mattress, especially if it has a fabric cover or is not entirely waterproof.
- Test in Sections: Work in small sections to ensure thorough inspection and to avoid missing any leaks.
- Be Patient: Some leaks are very small and may take a few moments to show bubbles. Take your time and inspect each section carefully.
- Ventilate the Area: If you’re indoors, make sure the room is well-ventilated to avoid inhaling soap fumes.
- Check the Valve: Sometimes, leaks occur around the inflation valve. Apply the soap solution around the valve area and check for bubbles.
The soap and water method is effective for finding even the smallest leaks in an air mattress. It’s a simple yet powerful tool that can save you the cost of replacing your mattress by allowing for precise repairs.
The Submersion Technique
For smaller air mattresses, the submersion technique can be an effective way to locate holes. This method involves submerging parts of the inflated mattress in water and watching for air bubbles, which indicate a leak. Here’s how to perform the submersion technique:
Instructions for Submerging the Mattress:
- Inflate the Mattress: Fully inflate the mattress to ensure that any leaks are more pronounced.
- Fill a Large Container or Bathtub: Use a container or bathtub large enough to submerge sections of the mattress. If using a bathtub, ensure it’s clean to avoid staining the mattress.
- Submerge the Mattress: Gently place sections of the mattress into the water. It’s best to start with the areas you suspect might have a leak, such as places that have been exposed to sharp objects or rough surfaces.
- Look for Bubbles: As you submerge each section, watch for air bubbles escaping from the mattress. The stream of bubbles will lead you to the exact location of the leak.
- Mark the Leak: Once you locate a leak, mark the area with a waterproof marker or a piece of waterproof tape.
- Dry the Mattress Thoroughly: After the inspection, dry the mattress completely to prevent any water damage or mold growth.
Practicality and Limitations:
- Size Limitations: This method is more feasible for smaller air mattresses due to the practical challenges of submerging larger ones.
- Handling Care: Be gentle when handling the inflated mattress to avoid creating additional stress points that could lead to more leaks.
- Water Safety: Ensure that the mattress is designed to be water-resistant. Some air mattresses have materials that should not be excessively exposed to water.
- Thorough Drying: It’s imperative to dry the mattress thoroughly after submersion to prevent any internal moisture buildup, which could lead to mold or mildew.
- Space Requirements: This method requires a large space with enough water to submerge sections of the mattress, which may not be practical for everyone.
While the submersion technique is effective in accurately locating leaks, it’s more suitable for smaller air mattresses and in situations where you have the appropriate space and facilities to perform it safely.
Using High-Tech Leak Detection Tools
In certain scenarios, especially when dealing with elusive leaks, high-tech leak detection tools can be incredibly useful. These electronic devices are designed to identify air leaks with precision and efficiency.
Overview of Electronic Leak Detectors:
- Ultrasonic Leak Detectors: These devices work by emitting ultrasonic sound waves that are inaudible to the human ear. When these waves encounter the turbulence created by escaping air, the detector translates this into a sound or visual signal, indicating the presence of a leak.
- Infrared Thermal Cameras: While more commonly used in industrial settings, infrared thermal cameras can be employed to detect temperature differences caused by air leaks. Cooler air escaping from a hole can be visible on the camera’s thermal imaging.
- Acoustic Leak Detectors: These tools use sensitive microphones to pick up the sound frequencies produced by air escaping a leak. They often come with headphones and visual indicators to help pinpoint the exact location of the leak.
Recommendations for Specific Scenarios:
- Large or Multiple Mattresses: In situations where you have to regularly inspect several air mattresses, such as in a rental business or a large camping event, electronic leak detectors can save significant time and effort.
- Hard-to-Find Leaks: When traditional methods fail to locate a leak, especially in the case of very small or well-hidden punctures, these high-tech tools can be invaluable.
- Professional Repairs: For those who offer professional repair services for air mattresses, investing in electronic leak detection equipment can enhance the efficiency and accuracy of their work.
- Frequent Usage: If you rely on air mattresses regularly, such as in an RV or as a primary bed, having a reliable way to quickly find leaks can be crucial for maintaining consistent comfort.
Considerations:
- Cost: High-tech leak detection tools can be an investment, with prices varying based on sophistication and brand.
- Learning Curve: Some of these tools require a bit of practice and understanding to use effectively.
- Availability: Not all electronic leak detectors are readily available for consumer purchase and may need to be ordered from specialized suppliers.
Using high-tech leak detection tools represents a more advanced approach to locating air leaks in mattresses. While not necessary for everyone, they offer a powerful solution in scenarios where traditional methods are insufficient or impractical.
Listening for Leaks
Using sound to detect air leaks in an air mattress is a simple yet effective technique, especially when other methods are not feasible. This approach relies on your ability to hear the subtle hissing or whistling sound of air escaping from a puncture.
Techniques for Using Sound:
- Create a Quiet Environment: Find a quiet room where external noises are minimized. Turn off any background noise like music, fans, or air conditioning to improve your ability to hear the leak.
- Inflate the Mattress Fully: Make sure the mattress is fully inflated. The increased internal air pressure can make the escaping air more audible.
- Listen Closely: Place your ear close to the mattress and move slowly around it, paying special attention to areas prone to leaks like seams, the area around the valve, and the underside of the mattress.
- Use a Tube: If you’re having trouble pinpointing the leak, use a small tube or a rolled-up piece of paper. Place one end near your ear and move the other end along the surface of the mattress. This can help amplify and isolate the sound of the leak.
Pros and Cons of the Sound Detection Method:
Pros:
- No Special Equipment Needed: This method does not require any special tools or preparations, making it easily accessible to anyone.
- Quick and Convenient: It’s a quick way to check for leaks, especially if you suspect a specific area.
- Good for Large Leaks: This method is particularly effective for finding larger leaks where the sound of escaping air is more pronounced.
Cons:
- Not Effective for Small Leaks: Very small holes may not produce a detectable sound, making this method less effective for pinpointing tiny punctures.
- Requires a Quiet Environment: The success of this method heavily depends on having a quiet environment, which might not always be possible.
- Time-Consuming: If the leak is not immediately apparent, this method can be time-consuming as you may need to listen to the entire surface of the mattress.
- Physical Strain: It can be physically uncomfortable or challenging to position yourself close enough to the mattress for extended periods.
Listening for leaks is a straightforward approach that can be particularly useful when you suspect a leak but lack other tools or methods to confirm its presence. While it has its limitations, especially for smaller leaks, it can be a quick first step in your leak detection process.
Regular Maintenance Checks
Conducting regular maintenance checks on your air mattress is crucial for both preventing and quickly identifying leaks. Routine inspections can significantly extend the life of your mattress and ensure it remains comfortable and reliable.
Importance of Regular Inspections:
- Early Detection of Issues: Regular checks help you catch potential problems, like small leaks or areas of wear, before they become major issues.
- Prolong Mattress Life: By addressing leaks and wear early, you can prevent further damage and extend the overall lifespan of your air mattress.
- Maintain Comfort: Consistent inspections ensure that your air mattress remains in optimal condition for a comfortable sleep.
Tips for Maintaining an Air Mattress:
- Inspect Before and After Use: Especially if your air mattress is used infrequently, inspect it each time you inflate and deflate it. This includes checking for any visible signs of wear or damage.
- Avoid Over-Inflation: Inflate your mattress according to the manufacturer’s guidelines. Over-inflation puts extra stress on the seams and material, increasing the risk of leaks.
- Use Protective Coverings: Use a mattress cover or a fitted sheet to protect the surface from abrasions and punctures. This is particularly important if the mattress is used on rough surfaces or outdoors.
- Store Properly: When not in use, deflate the mattress completely, fold it carefully to avoid creases or strain on the material, and store it in a cool, dry place. Avoid placing heavy items on top of the stored mattress.
- Keep Away from Sharp Objects: Be mindful of the mattress’s surroundings. Keep it away from sharp edges, pet claws, or anything that might puncture the surface.
- Clean Regularly: Wipe down the mattress with a damp cloth and mild detergent to keep the surface clean and free from substances that might degrade the material over time.
- Check the Valve: Ensure the inflation valve is not loose or damaged, as this can also be a source of slow leaks.
Regular maintenance and careful use of your air mattress can significantly reduce the risk of holes and leaks, saving you time and effort in repairs. A well-maintained air mattress not only offers better sleep quality but also ensures that the mattress is ready to use whenever you need it.
Conclusion:
Throughout this guide, we’ve explored various methods to help you find and address leaks in your air mattress, ensuring its longevity and functionality. From the initial visual and tactile inspections to the more detailed soap and water method, each technique offers a way to effectively identify air leaks. For smaller mattresses, the submersion technique provides a straightforward solution, while high-tech leak detection tools offer a more advanced approach for difficult-to-find leaks. Additionally, the simple yet effective method of listening for leaks can often reveal the source of the problem.
It’s important to remember that regular maintenance checks are key to the long-term health of your air mattress. These routine inspections not only help in early detection of leaks but also in preventing them. Simple habits like proper inflation, using protective coverings, avoiding sharp objects, and storing the mattress correctly can significantly reduce the risk of damage.
Maintaining your air mattress requires a little effort, but it’s worth it for the comfort and convenience these beds provide. Regular checks and prompt repairs will ensure that your air mattress remains a reliable and comfortable sleeping solution, whether it’s used for occasional guests, camping trips, or everyday use. By being proactive in your mattress care and attentive to any signs of wear and tear, you can enjoy the benefits of your air mattress for many years to come.
FAQ Section: Common Concerns Related to Finding and Fixing Air Mattress Holes
Q1: How do I know if my air mattress has a leak? Signs of a leak include noticeable deflation during use, a hissing sound, or feeling air escaping from the surface.
Q2: Can I repair an air mattress leak myself? Yes, most leaks can be repaired at home using a patch kit or DIY methods like adhesive patches and sealants.
Q3: Where are leaks most likely to occur on an air mattress? Common areas include seams, the area around the valve, and the bottom of the mattress where it contacts the ground.
Q4: Is it safe to use a patched air mattress? Yes, if properly repaired, a patched air mattress is safe to use. Ensure the patch is securely applied and fully dried before use.
Q5: How can I prevent future leaks in my air mattress? Avoid over-inflation, keep it away from sharp objects, use a protective cover, and store it properly when not in use.
Q6: Are repair kits specific to certain brands or types of air mattresses? Some repair kits are brand-specific, but many are universal. Check the compatibility before purchasing a repair kit.
Q7: Can I use regular household items to patch a leak? While specific patch kits are recommended, in a pinch, items like duct tape or super glue can provide a temporary fix.